


Creating a Discord Bot using .NET Core and hosting it on Azure App Services

Discord is an online communication platform built specifically for gaming. You can chat with your friends in text channels, but most importantly talk to each other inside of voice channels.
There are multiple ways you can extend Discord as a developer, but we’ll learn how to extend Discord using its bot features.
Discord Bots #
Bots in Discord can be added to both voice and text channels where they can both listen and respond to users input. To real users, a bot looks just like a normal participant that can be online and offline, although explicitly marked as a bot. Permission management on channels also works the same for users and bots. This makes for an interesting platform to integrate services with.
To build your own bot, you need to connect to Discords WebSocket API’s. This can be a simple command line application running on a Raspberry PI, but we’ll use the WebJobs feature in Azure App Services to deploy our .NET Core project to. In our .NET Core project we’ll use the DSharpPlus library to more easily interact with the Discord API.
Creating our bot #
Before writing code, we need to create a Discord Bot in Discords Developer portal. Once created, you need to note down the “Token” and the “Client Id” as we’ll need both later. You can follow DSharpPlus’ tutorial on how to create this.
August 31, 2022 Discord Update: Reading Message Content is now a Privileged Intent. For this tutorial to work, you'll need to go into your Discord Application > Bot and find the "MESSAGE CONTENT INTENT" toggle, enable it and click "Save Changes". Once your bot reaches 100 or more servers, this will require verification and approval. Instead of using Message Content, Discord recommends using the Interactions API to bring new features like Slash Commands, Buttons, and Select Menus that don't require access to message content.
Create a simple .NET Core console application using the dotnet CLI or your editor of choice.
Now add the DSharpPlus package to your project using either package manager or the dotnet CLI:
Install-Package DSharpPlus -Version 3.2.3
# or
dotnet add package DSharpPlus --version 3.2.3
Now that’s been added, let’s write the minimum functionality to validate the bot works:
using DSharpPlus;
using DSharpPlus.EventArgs;
using System;
using System.Threading.Tasks;

namespace DiscordBotDemo
{
    public class Program
    {
        public static async Task Main(string[] args)
        {
            var discordClient = new DiscordClient(new DiscordConfiguration
            {
                Token = "YOUR DISCORD TOKEN",
                TokenType = TokenType.Bot
            });

            discordClient.MessageCreated += OnMessageCreated;

            await discordClient.ConnectAsync();
            await Task.Delay(-1);
        }

        private static async Task OnMessageCreated(MessageCreateEventArgs e)
        {
            if(string.Equals(e.Message.Content, "hello", StringComparison.OrdinalIgnoreCase))
            {
                await e.Message.RespondAsync(e.Message.Author.Username);
            }
        }
    }
}
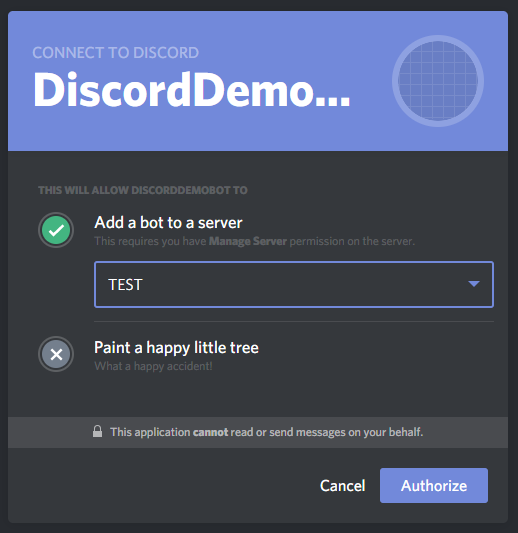
When you build and run the application, you’ll notice nothing is happening. Nothing is happening because the bot hasn’t been added to any discord servers (aka guilds). To invite your bot to a Discord server, use the following OAuth link:
https://discordapp.com/oauth2/authorize?client_id=[YOUR_CLIENT_ID]&scope=bot&permissions=0
Once your bot has been added to the server, simply type “hello” and it should respond to you with your username.
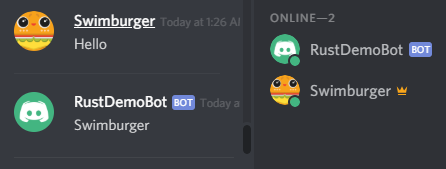
Once you terminate your console app, the bot also goes offline in Discord.
Deploying to Azure App Service WebJobs #
In the previous section, we learned that the discord bot goes online when the console application is running, and immediately goes offline when the process has been terminated. For a bot to function, the console application needs to continuously be running.
This means Azure App Service websites isn’t a good deployment target, but the WebJobs feature inside of Azure App Service is a suitable host. Azure WebJobs can be used to automatically have some code execute when certain events happen such as a CRON trigger, Blob trigger, Service Bus message, etc.
WebJobs are the predecessor to Azure Functions and for most scenarios, Azure Functions is now the recommended approach. Unfortunately, Azure Functions can’t run forever and will time out if you try.
WebJobs on the other hand have one other mode of running called “Continuous” mode, so in our scenario WebJobs is recommended over Azure Functions.
The simplest way to deploy the console app to Azure WebJobs is using right click + publish inside of Visual Studio. Here you can choose to create a new Azure App Service:
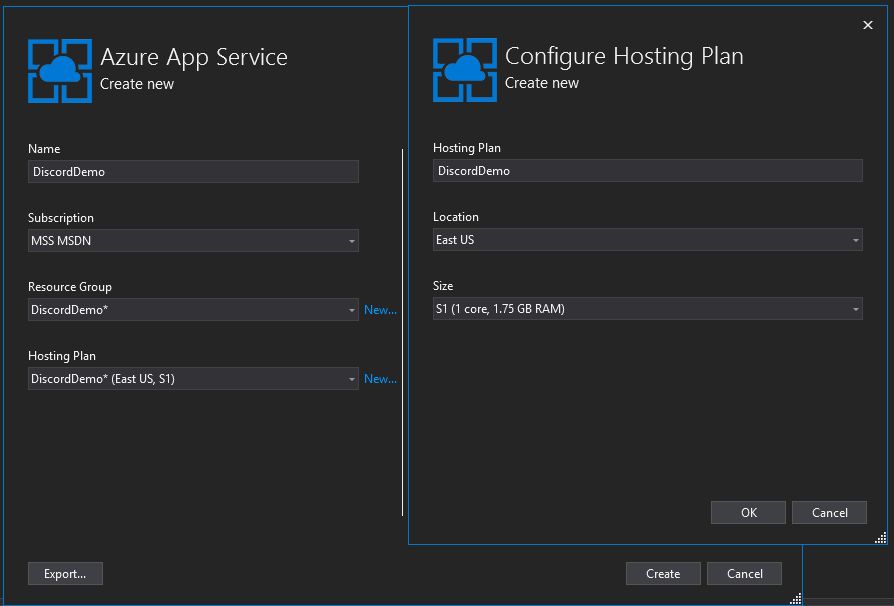
Before actually publishing your console application to Azure, change the WebJob Type from “Triggered” to “Continuous”:

Hit publish and your Discord bot will be online running in Azure within minutes!
Keep in mind, depending on the service plan (pricing) you picked, the feature “always on” won’t be available. For your discord bot to always be online, you have to enable “always on” or Azure will pause your WebJob.
Summary #
In this post we created a Discord Bot running in Azure using the following steps:
- Create a Discord Bot in the Discord Developer portal
- Create a .NET Core console application
- Add the DSharpPlus package and use the library
- Deploy the console app to host your Discord bot in Azure WebJobs
You can find the code on GitHub, and ask any question below. Cheers!

